Mulching Guide - Types of Mulch and the Right Way to Use Them
By Parvez Akhtar Pasha | Apr 16, 2026
You know what, mulching is not optional at all. It is also an important part of gardening, just like watering and fertilizing. But I didn't realize this in the beginning; I understood it after struggling for a while.
At first, I thought gardening was easy – just give water, add some fertilizer, and the plants will grow. But I was wrong. Gardening includes many important things, and mulching is definitely one of them.
Mulch actually works like a cover. It slows down water loss from the soil, keeps the soil temperature more stable, and blocks sunlight from reaching weed seeds.
Because of this, the soil stays moist for longer, roots stay comfortable, and plants grow better without needing constant watering or extra effort.
That layer (cover) can be anything natural, like dry leaves, straw, or even coco peat, or something artificial, like plastic or stones.
This creates a perfect environment for plants to grow. Without it, all your hard work doesn't give the results you expect.
I don't think I need to explain what mulch is – you already get a clear idea from the intro. So, let's start with the different types of mulch you can actually use in your garden.
Types of Mulch
Mulch is mainly of two types, organic and inorganic.
I have used both in my garden, and this is where I finally started understanding things better. Once I knew the difference, it became much easier to decide which one to use and when.
Now, let me break down the difference between organic and inorganic mulch.
Organic Mulch
I personally use organic mulch the most, and I always recommend it to other gardeners. It's good for the soil because it naturally breaks down and improves soil structure and fertility over time.
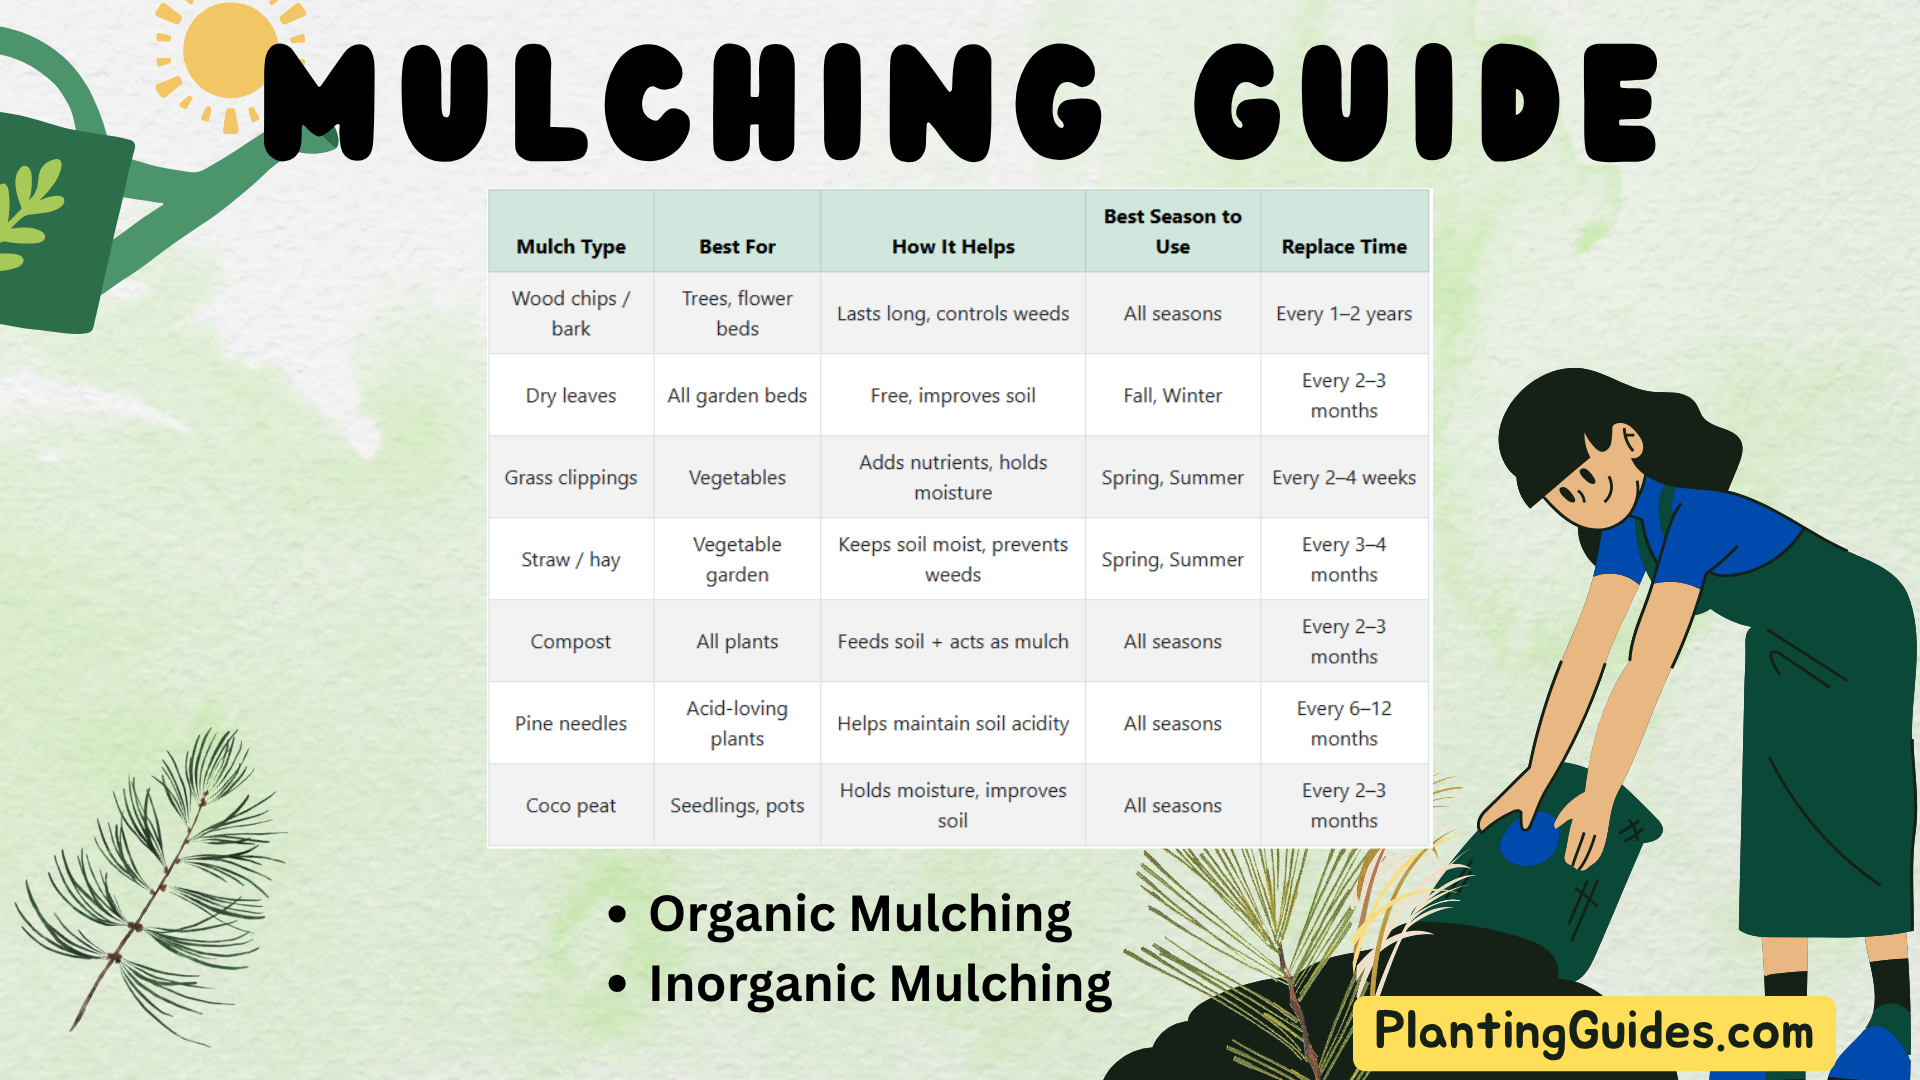
| Mulch Type | Best For | How It Helps | Best Season to Use | Replace Time |
|---|---|---|---|---|
| Wood chips / bark | Trees, flower beds | Lasts long, controls weeds | All seasons | Every 1–2 years |
| Dry leaves | All garden beds | Free, improves soil | Fall, Winter | Every 2–3 months |
| Grass clippings | Vegetables | Adds nutrients, holds moisture | Spring, Summer | Every 2–4 weeks |
| Straw / hay | Vegetable garden | Keeps soil moist, prevents weeds | Spring, Summer | Every 3–4 months |
| Compost | All plants | Feeds soil + acts as mulch | All seasons | Every 2–3 months |
| Pine needles | Acid-loving plants | Helps maintain soil acidity | All seasons | Every 6–12 months |
| Coco peat | Seedlings, pots | Holds moisture, improves soil | All seasons | Every 2–3 months |
Yes, you can also use compost as mulch, and trust me, it works really well. I use it in my garden quite often. It not only covers the soil but also feeds the plants at the same time.
The only thing to keep in mind is that compost breaks down faster than other mulches, so you may need to reapply it more often.
Considering the lifespan and cost, I would suggest using wood chips if you want something long-lasting and low maintenance.
And if you want a free option that still improves your soil, dry leaves are a great choice.
Inorganic Mulch
I also tried inorganic mulch like plastic sheets and stones. They are actually very good at one thing - controlling weeds. If you spread them, weeds can't grow easily. It also slows down water loss from the soil.
I only use them when weeds get out of control, and I need a quick solution.
I don't prefer using inorganic mulch around plants during hot weather. Because materials like stones and gravel absorb a lot of heat from the sun and make the soil underneath warmer than usual. This extra heat can stress plant roots, especially for vegetables, small plants, and newly planted seedlings.
When to Use Mulch – The Most Important Thing
This is where most people make mistakes, even I am one of them. Mulch works really well, but only when you use it at the right time. If the timing is wrong, plants don't get any benefit from that.
Let me tell you the mistake I made. I actually added mulch when the soil was dry.
If the soil is dry and you cover it with mulch, you are just trapping that dryness underneath. So, the plants will still struggle, and you won't get the results you expected after mulching.
So now I follow one simple rule: water first (if the soil is dry), then mulch.
Mulch doesn't add moisture to the soil, it only holds what's already there.
Now, I water the soil deeply first, wait until it feels a little wet and cool, and then add mulch on top. It's important to soak the soil before mulching.
Another important time to use mulch is just before extreme weather. Before the summer heat gets too strong, add mulch to protect the roots from overheating.
In the same way, if you add mulch before winter, it will protect the roots from sudden cold, as mulch helps keep the soil temperature steady.
Here's when mulching works best, based on my personal experience.
| Situation | What I Do | How Much Mulch to Use | Type of Mulch |
|---|---|---|---|
| Before summer heat starts | I apply mulch 2–3 days before the heat becomes strong | 2–3 inches thick | Straw, grass clippings, dry leaves |
| Before winter cold | I add a thick mulch layer before temperatures start dropping | 3–4 inches thick | Dry leaves, straw, bark mulch, Wood chips |
| After transplanting (2–3 days later) | I wait a few days for plants to settle, then add mulch | 1–2 inches (light layer) | Compost, coco peat, straw |
Pine needle mulch is especially great for acid-loving plants because it naturally contains mild acidic compounds, and as it slowly breaks down, it releases them little by little into the soil and makes the soil slightly acidic.
I personally use it for plants like blueberries, azaleas, rhododendrons, and hydrangeas that prefer acidic soil.

After heavy rain, I wait at least 1–3 days until excess water drains, then I apply a 2–3 inch layer of mulch evenly around the plants.
You should skip mulch during the rainy season because the soil already stays very wet, and if you add mulch, it holds even more moisture than plants need. This keeps the roots too wet and can cause root rot or fungal problems. This is actually the time when mulch can be more harmful than useful.
Perfect Mulch Type and Thickness for Different Plants
Not every plant needs the same amount of mulch. Small plants like leafy greens or seedlings have shallow roots, so too much mulch can keep the soil too wet and harm them.
On the other hand, bigger plants like fruit trees or shrubs have deeper roots and face more heat stress, so they need a thicker layer to stay protected.
| Plant Category | Examples | Ideal Thickness | Best Materials |
|---|---|---|---|
| Leafy Greens | Spinach, Lettuce, Coriander | 1–2 inches | Dry leaves, straw, compost |
| Fruiting Vegetables | Tomato, Chilli, Brinjal, Cucumber | 2–3 inches | Straw, dry leaves, coco peat |
| Root Crops | Carrot, Radish, Beetroot, Potato | 1–2 inches | Fine compost, coco peat |
| Herbs | Basil, Mint, Parsley | 1–2 inches | Dry leaves, straw |
| Flowering Plants | Marigold, Petunia, Rose | 2 inches | Compost, straw, leaves |
| Shrubs | Hibiscus, Bougainvillea | 2–3 inches | Bark, wood chips, leaves |
| Fruit Trees | Mango, Guava, Lemon | 3–4 inches | Wood chips, bark, straw |
| Big Shade Trees | Neem, Banyan | 3–5 inches | Wood chips, leaves |
| Seedlings (Young Plants) | Any young plant | 0.5–1 inch | Fine compost, coco peat |
| Pots / Containers | Any potted plant | 1–2 inches | Coco peat, dry leaves |
| Raised Beds | Mixed vegetables | 2–3 inches | Straw, leaves, compost |
| Indoor Plants | Snake plant, Money plant | 0.5–1 inch | Coco peat, fine bark |
| Succulents & Cactus | Aloe, Cactus | 0.5–1 inch | Gravel, sand |
| Climbers / Vines | Bottle gourd, Beans | 2–3 inches | Straw, dry leaves |
| Perennials | Lavender, Daylily | 2–3 inches | Bark, compost |
| Annual Plants | Seasonal flowers, veggies | 2 inches | Straw, leaves |
| Weed Control Areas | Empty beds, pathways | 3–4 inches | Wood chips, bark |
Mulching is not actually necessary for succulents and cacti. These plants grow best in dry soil and actually prefer exposed, well-draining soil.
But I still use gravel or small stones on these plants, even though I know they don't really need it. If you ask me why, it's purely for decoration. It just makes the plant look clean and finished, nothing more than that.
Make sure the mulch does not touch the plant stem or tree trunk. Always leave a small gap around it. It's necessary because the stem or trunk should not stay wet all the time.
Mulching in Pots and Raised Beds
One thing I didn't realize at first is that pots and raised beds behave very differently from ground soil, they dry out much faster than normal ground soil.
In pots, the soil gets dry very quickly, especially in summer. Raised beds are a bit better, but still lose moisture faster than the ground.
That's why mulch becomes even more important here.
In Pots
In pots, I use a light layer of mulch (around 1 inch), like dry leaves or coco peat. I don't make it too thick because pots can also hold water if there is too much mulch or poor drainage.
For the potted plants, I usually use dry leaves or coco peat because they don't compact too much. If your mulch gets tight and pressed down, air can't reach the soil properly, water may not go in evenly, and the top can become hard. In short, it stops working like mulch and starts acting like a barrier.
I always check the soil about 1–2 inches deep with my finger before watering. Many times the top looks dry, but inside it's still a bit damp because of the mulch. This simple habit has saved my plants from overwatering.
Also, good drainage is really important. If water doesn't drain properly, even a little mulch can make the soil stay too wet.
In Raised Beds
In raised beds, I use a little thicker layer of mulch (around 2–3 inches) compared to pots because there is more space and better drainage.
I also noticed that without mulch, raised beds dry unevenly. Some areas dry faster than others. Mulch fixes that and keeps everything balanced.
Yes, this can happen in ground soil too, but in raised beds it happens faster and is more noticeable, so that’s why I mentioned it here.
The type of mulch also matters. I mostly use dry leaves, straw, or wood chips in my raised beds. These spread easily, don't get too tight, and water can pass through them easily. And the best part is, they slowly break down and improve soil quality.